Notes
from the Curator's Office:
|
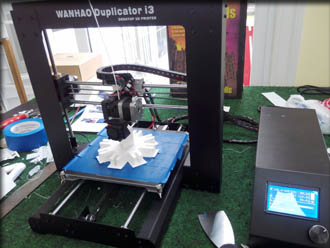
The
Wanhao Duplicator i3 working on a part for an engineering
project.
|
Fun
with a 3D Printer
(6/16)
Recently my son convinced me that the museum needed a 3D printer.
To be honest, I'd already been thinking about the usefulness
of one for a while already to fabricate art objects and various
parts. He's a mechanical engineering student and he thought
that having one might also be helpful for his senior project.
For
those not familiar with what a 3D printer is, the name is very
appropriate. A 2 dimensional printer creates things on paper
with only two dimensions - length and width. A piece of paper
can be long and wide, but for all practical purposes has no
height. As a 2D printer moves its head over the paper, it lays
down ink where needed to create a letter or an image.
A three
dimensional printer pretty much does the same thing, but can
create objects with height. A typical home three-dimensional
printer moves its print head over a bed, depositing molten plastic
onto a surface layer by layer (with each of the layers being
perhaps a millimeter high) to create something with length,
width and height. (To picture it, imagine a hot glue gun on
the end of a computer arm squeezing the glue out to create a
shape).
I put
my son in charge of making some recommendations fora good printer
and he found the Wanhao Duplicator i3. It's about $400
with mostly metal parts (many cheaper 3D printers are built
with wood). It can handle either polylactic acid (PLA) or acrylonitrile
butadiene styrene (ABS) plastic. This makes it a little more
flexible than the cheapest 3D printer, but also more expensive.
To print ABS, a printer needs a heated bed (the place where
the printer deposits the plastic), because ABS tends to shrink
when it cools and its necessary to keep the material as warm
as possible while the printing process is ongoing. Cheaper printers
do not have heated beds, which limit them to printing only PLA.
PLA is great material for most projects, but does have some
limitations. For example, it does not do as well if placed outside
and it's not as strong or flexible as ABS.
|
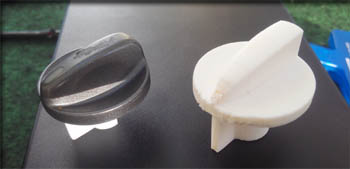
The
original broken knob and the replacement before painting.
|
The
Duplicator i3 arrived in a large box a few days after we ordered
it. My son assembled it in about an hour and it was ready for
testing. There are two ways to control a 3D printer. The first
is to connect it to a computer with a cable and then use software
on the computer to control the action of the printer. This works,
but means you need to keep your computer running while the printer
is operating. Since a large print job can easily run 12 hours
or more, this means your computer has to be on that entire time.
While you can typically do other stuff on your computer at the
same time it handles the printer, it also means that you can't
stop or reboot your computer without bringing the print job
to a premature end.
A much
easier way to control the printer is to have the computer write
a file containing the print instructions onto a memory chip,
then take that chip and plug it into the printer and let the
printer get the instructions off the chip. The Duplicator i3
uses a micro SD card for this. In fact, it came with a micro
SD card on which a file you can test print is already installed.
Using a small bit of PLA that came with the printer and the
file on the card, we were soon able to try out our new toy by
creating a small model of a hand giving the "OK" sign in yellow
plastic.
At first
t he printer is mesmerizing to watch. It consists of a flat
bed, perhaps 10 inches square, that can move from the front
of the printer to the back and vice versa. On either side of
the bed are two support columns, each a little more than a foot
high with a bridge at the top connecting them perhaps a foot
above the bed. There is also another bridge between the supports
that can move up and down. On the bottom of this second bridge
is the print head. It can run left and right the full length
of the bed. Since the arrangement covers all 3 dimensions, the
print head can be positioned over the bed at every location
and height in about a 10 inch cubic area.
|
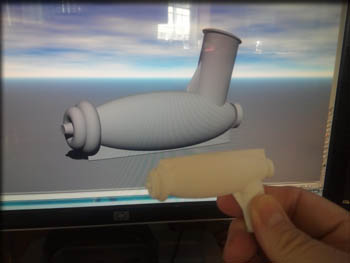
An
early test of Bryce with the printer: the idea and the
reality it created.
|
As it
works, it chugs along building layer after layer of whatever
object you choose. At first it can be hard to tell what it's
making, but as you watch it slowly brings whatever you created
into existence within this 10-inch cube.
The
plastic to make the object comes in the form of filament that
looks a lot like the stuff you use in your weedwacker. A standard
spool weighs 2.2 pounds (1 kilogram) and is attached to a pylon
on top of the printer's unmoving top bridge. As the printer
uses the filament, it unspools and is sucked into the print
head where it is melted and excreted out under the direction
of the file of computer instructions.
Because
it can move the print head anywhere on the bed, in theory the
printer can print any shape you can imagine. However, there
are some practical limitations. For example, it can't start
a print in mid-air. This means that if the object you are printing
has large areas that overhang, the printer must put in supports
under that part of the print. Usually this looks like a thin
scaffolding. These supports can be somewhat problematic as they
can make a bottom section of the object that should be smooth
or detailed look rough once the supports are broken off. (One
of the first things I built was a model of the Millennium Falcon
that I downloaded from the web. The top looked nice, but most
of the bottom was rough and bumpy from supports).
Some
printers solve this problem by printing two types of plastics.
The supports are built with a type of material that is easily
dissolved and washed away, leaving just the model. However,
such printers tend to be much more expensive.
|
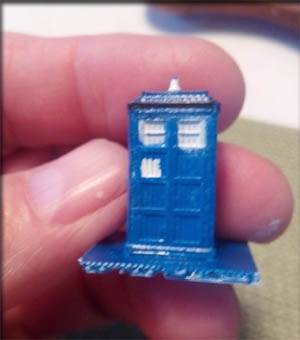
The
TARDIS printed from plans downloaded off the web.
|
There
is a large number of designs for objects that people have created
and uploaded onto the web at sites like http://www.thingiverse.com/.
This means that for many common objects, you don't need to do
the designing yourself. I own an HO train platform and as a
gag wanted to put a scaled-sized TARDIS (from the long running
British TV show Dr. Who) on it. I had looked around for one
the right size, without success. However, as soon as I had the
printer working I was able to find a model of the TARDIS online,
download it, scale it to the right size and print it. I only
needed to paint it the proper blue color before placing it on
my train platform.
While
there are a zillion items you can download and print, perhaps
the best satisfaction from the machine comes from designing
your own objects and printing them. For many years I've done
computer 3D art using such programs as Bryce and Daz Studio.
While I could produce interesting pictures with this software,
the printer now allows me to produce real objects.
One
of the first things I designed and made, however, was a simple
knob. A friend of my wife's had an older Subaru and the knob
that controlled the hot/cold for the ventilation system had
broken off. The price for a new one from the dealer was around
$38. It occurred to me I could just design and print one. With
30 minutes of software work and an hour of printing, it was
done. After a little black paint I was able to install it into
her car and she no longer needs me to come out with a pair of
pliers every season to switch the mode on her heater.
My first
large project was a ray gun. It's part of an art piece based
on H.G. Well's War
of the Worlds. It was designed using Bryce and consists
of six parts printed separately. By designing a larger object
as multiple pieces and printing them separately, you can make
the object larger than the print bed can hold. This approach
also keeps the printing times down and allows you to orient
each piece when printed to avoid as many supports (and the problems
associated with the bumpy surface they leave) as possible.
While
you could probably construct a ray gun using more standard techniques,
the use of the computer and printer allow you almost complete
freedom in design. For example, the ray gun is designed to be
held by a Martian tentacle and the grip as an indented spiral.
While this would be difficult to make with regular tools, the
printer can construct it just as easy as any other shape.
|
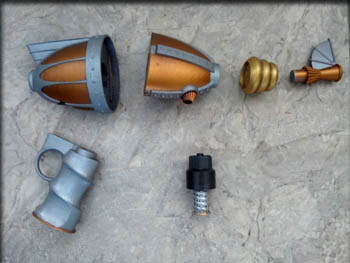
The
ray gun as individual parts before assembly.
|
While
today the Wanhao Duplicator i3 and other similar printers are
more of a hobbit's toy than a consumer product (they require
fairly regular alignment and maintenance), it isn't hard to
imagine a day a decade or two from now where a wide variety
of objects could be printed by simply downloading the plans
from a computer and letting the device create it.
If you
don't want to wait that long, there are certainly a number of
3D printers out there you can buy and experiment with. While
I found the Wanhao Duplicator i3 a great product, it is possible
to get 3D printers for as low as $200 (though you would be limited
to printing PLA). There are also more expensive printers which
give you such options as more speed and an enclosed printing
space (this can be a useful safety option if you have kids as
the heat involved in melting the plastic is significant, usually
over 300 degrees Fahrenheit).
While
I used Bryce as my design software because I already owned it
and was familiar with it, there are other 3D programs such as
Autodesk 123D Design, Tinkercad and FreeCAD
that can also do the job. Many of them are free. In addition
to a design tool you will need a program called a slicer.
The slicer takes the file containing the 3D object you create
with the design program and creates another file with a set
of instructions (gcode) that the printer can follow to build
your object (It's called a slicer because it slices the model
up into many levels that the printer will create one at a time).
The slicer program can also rotate and scale the object as well
as give you an estimate on how long it will take to print it
and how much filament it will use. An example of a free slicer
program is Cura.
A standard
reel of plastic (ABS or PLA) runs about $20 on Amazon and you
can make a lot of objects with 2.2 pounds of plastic (The slicer
software usually makes the objects hollow with just a crosshatching
inside to give it strength). Even large objects rarely cost
more than a dime in terms of materials. The plastics come in
various colors (and also glow-in-the-dark), though I usually
paint my creations. PLA is naturally clear (and you can buy
it that way) but because the printer lays down one slice at
a time you can't really make anything that is perfectly clear
like glass with it, however. Such an object would be translucent.
|
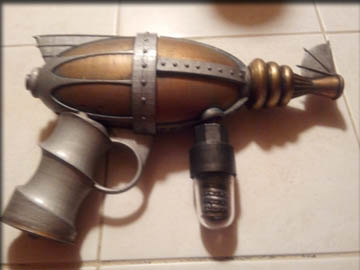
The
gun in its final version.
|
If you
want to spend some more money you can get PLA which is mixed
with particles of copper, bronze or even wood. While the resulting
object made from these materials may look like those substances,
and can even be polished, they do not have the strength of those
materials, however.
Even
if you don't want to create an object from scratch, there are
thousands of objects other people have designed and place online
for download. So whether you are hankering for a statue of Cthulhu
or a model of the rocket from TV show Fireball XL-5, it can
be yours for pennies with your 3D printer.

Copyright
Lee Krystek 2016. All Rights Reserved.